TUTORIAL: Soul Out
SOUL OUT
Topics: Advance Composite and Photo Manipulation
INTRODUCTION
In today's lifestyle, we are always busy, stressed, running from one place to another. Sometimes, I just want to be free, out of my body for a while, floating with freedom. If only I can just leave my body, soul out, and to explore things out there. This thought made me conceptualize this composition. Well, it is a creative campaign for a Vape shop, and alternatively for a stop-smoking campaign. Well, it is so ironic, just be creative in the delivery.SPECIFICATION
Nikon D5100, Nikkor 18 -55mm, 1/50s, f/3.8, ISO 320, flash, tripod, no filter
THE PICTURE
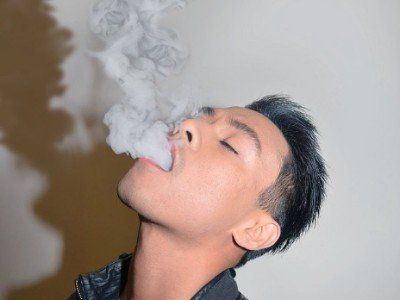
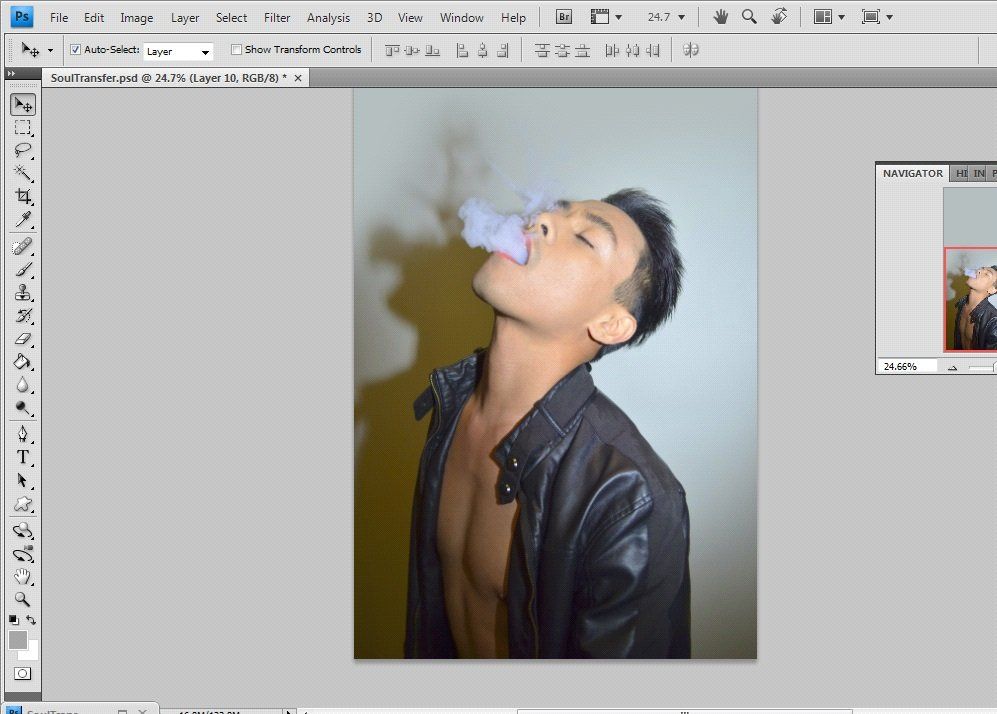
Before starting doing the actual shoot, planning is very important to make an easier and faster result. First, learn to control the production of the smoke. In this photo, I used an e-cigarette (or so-called vape). (HINT) It is a portable smoking device where you can smoke it everywhere (as the product claims, please refer to your state or country rules) and you can customize the flavor like a hookah, you can also select if you want to have nicotine or not, it is a good method for those people who wanted to quit smoking. It is easier to use a vape rather than a cigarette because vape can produce thick vapor than cigarettes. In controlling the smoke, learn not to blow the smoke fast, try to hold the smoke and then exhale it slowly and controlled as possible through the mouth. (HINT) Find a place that is confined and there is no movement of air and wind. Close all windows, doors, vents, air conditioning unit and fan. Second, to make it as natural and realistic as possible. Find a place with a plain background. (HINT) The background can be a hindrance in making this composition. Make it simple, plain and no detailed background. On the shoot I did, I intended shadows to appear. I shot my camera in portrait. You can use the built-in pop-up flash of your camera or a speed lite attachable flash for better and controlled light effect. )(HINT) Just make sure it is not too bright that will overpower the appearance of the smoke.
Now, we begin to shoot. Set your camera shutter priority. The form of the smoke is the vital subject in the composition. A stop-time effect is recommended so the form of the smoke is sharp, defined and crisp. Set exposure time to 1/50 second. ISO - 320, Exposure bias to - 0.30 step, it will darken the composition a little bit and highlights the shadows and increases the contrast on post-processing. Aperture is not a priority. F-stop is set f/3.8. Metering Mode is Center Weighted Average. Flash mode is on. (NOTE) This is only the values I used, you can use a different setup. These values indicated are solely for the purpose of the composition I did for the tutorial.
Visualized what poses you want for your model to portray. There are two pictures you need to shoot and to incorporate, there is the regular pose with the smoke and the smoky face appeared formed by the smoke. When you figure that out, start the usage of the device (vape, cigarette or any alternative) that will produce the smoke. (HINT) Let the model hold on it and then put it in their pocket or you can make it visible on the composition. (WARNING) If you are using an actual cigarette, be acknowledged it is a fire hazard, use an ashtray or any container that will avoid fire. Start letting your model use the device. (HINT) Do not rush your model. Be patient and keep an eye on the smoke formation. It is recommended to use Continuous Shoots (Release Mode) to better capture each frame formation.
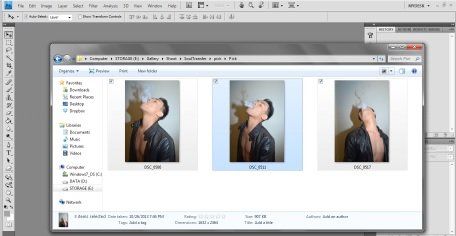
After few poses and you found your right composition, you can start the post-processing
POST PRODUCTION
The best format you can use in editing is in TIFF. The higher the resolution, the better so you can get every detail you need. First off, we need to create the composition before enhancing it so move away from the Lightroom, ViewNX2, or any enhancing software you have except for Photoshop.
1. Open Adobe Photoshop, any version is good as long as the basic tools are present like Clone Stamp and Basic Image Adjustments (Replace Color, Brightness/Contrast, Color Balance).
2. Open the files you selected. (OPEN > File name) or you drag the pictures from your location to your Photoshop workspace.
3. First, you will focus on the regular pose with smoke. Remove and clean up the details and elements that you want to remove. Example: Acne, unnecessary birth marks, random hair, irrelevant cloth accessory, anything that you do not want in the composition. You can use Magic Wand tool for same color surfaces or removing a plain background, Pen tool for precise details, Healing Brush and Clone Stamp tool for the acne and any other details you want to cover up. (HINT) I preserved the original background, I just enhanced the color to emphasized the smoke image.
4. After cleaning up everything, you will start making the smoky image. Go to the other image you selected and then crop the head off by separating the background, by using Magic Wand, if the surface is not complicated, check this reference for more information ( http://www.digitalartsonline.co.uk/tutorials/photoshop/how-remove-background-in-phot
oshop/) or you can use the pen tool for detailed background.
Check this reference for your information
( http://www.printwand.com/blog/using-the-pen-tool-to-cut-an-object-from-its-backgroun
d-in-photoshop).
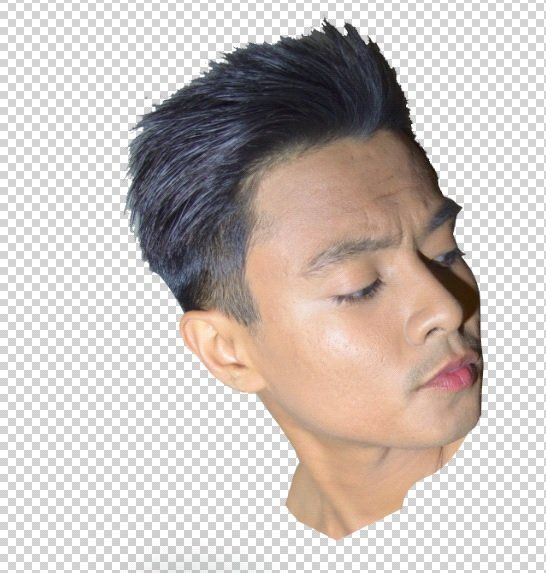
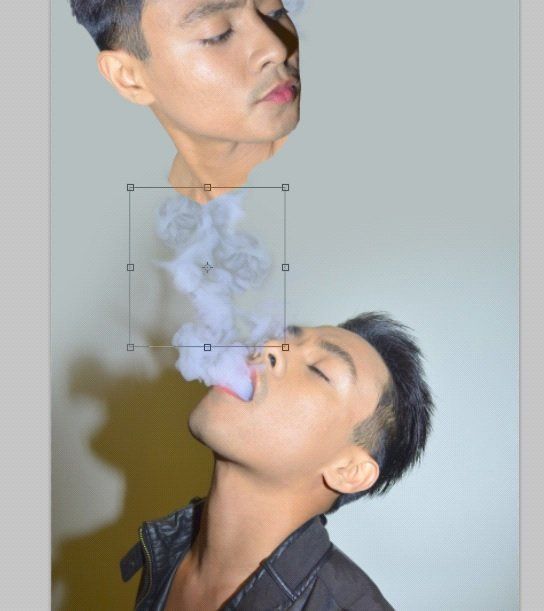
5. After you separate the head from the background, transfer the head to the regular pose by copying the layer of the head then paste it into the regular pose. Or you can just drag the layer of the head to the workspace of the regular pose. With the use of the Move tool, click the layer you want to move then just drag that layer to the other workspace where is the regular pose is located.
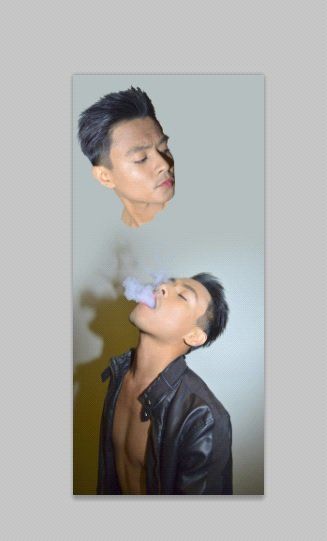
6. Arrange the layout of the head on the composition. (HINT)
Try to convey a story or a connection to make the composition more effective. Now, try to reproduce a trail of smoke going to the head. If you do not have sufficient smoke, you need to make some. You can use Pen Tool, tracing the end of the smoke (HINT)
the detailed of the smoke the better. When you already lock and have marquee (moving broken lines), Select Marquee Tool, right click > Layer Via Copy to duplicate the smoke. (HINT)
To make it look unique, try to rotate and play around with the transform, right click on the layer > Free Transform, try to rotate few degrees, also use the skew, distort, and perspective to make a unique form smoke.
7. After making few layers of smoke, highlight all those layers, right click > Merge Layers. All of those layers will become one. (HINT) Make sure to make it nice and realistic, Use Smudge Tool, to correct some details, add more dimension and to make it one nice trail of smoke.
8. Now, transforming the floating head into a smoky head, first make the head the same color with the smoke trail you just made. Click Image > Adjustments > Gradient Map. Click the color gradient on the Gradient Used for Grayscale Mapping, and the Gradient Editor will appear. On the lower part of the Editor, you can see an adjustable scale Click the box scale on the bottom to change the color and the top is to adjust the Opacity. When you click the box scale, click the Color: underneath it and the color selector with pop up. Left scale is the shadow and the right side is the highlights. (HINT) Make sure to use the Eyedropper Tool to get the exact color. Select the color on the smoke trail, get the highlight on the nearest brightest point from the head then the shadow is the darkest color of the trail smoke and the background.

9. Now you have the smoky head. Add more smoky details around the head, erase some hair and turn it into smoke, just redo step 6, in tracing smoke to add more details and making the head made realistic from smoke.
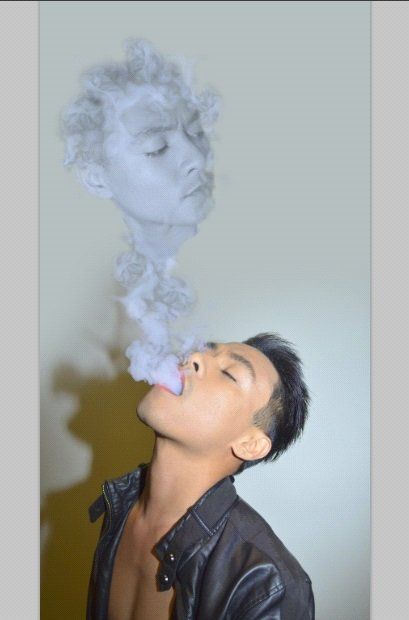
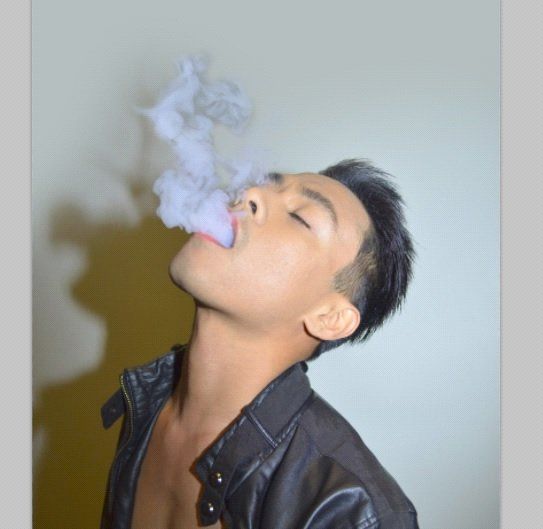
10. After finalizing the details, select all the layers from the smoke trail to the smoky head and make it into one layer by highlighting the selected layers, right click > Merge Layers. After that, make the opacity of the layer to 85%. It will make the head coherently relevant to the background. (HINT) When you lower the opacity, the color and the contrast will change too. So adjust the Brightness/Contrast (Image > Adjustment > Brightness/Contrast) or level (Image > Adjustment > Levels...). (NOTE) Also, consider the smoky head if you want to make it an emphasis or not. On my Critiques, some people said, smoke images should have some blurriness on it. If that is the case, go to Filter > Blur > Gaussian Blur, make the Radius 2.5 or depends how blurry you want it to be or like what I did, I wanted it to look crisper, so I increase the sharpness, go to Filter > Sharpen > Smart Sharpen, Amount: 125% and Radius: 0.5 pixel or how much sharpness you want.
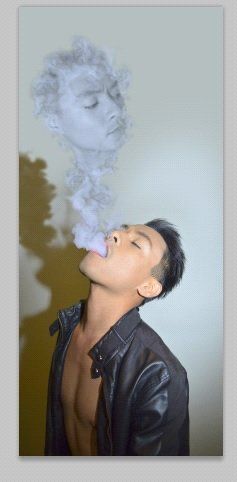
11. When the smoke trail and the head are set and good, we are going to make the shadow. Duplicate the layer of the smoky and the trail (should be in one layer) then replace the color (Image > Adjustment > Replace color) select the Fuzziness to 135, then adjust the Replacement color result to the original color of the shadow on the regular pose. (HINT) If the color is lighter, make the opacity to 85% then duplicate another layer then make the opacity 75%. You can adjust it depends on the lighting you have.
12. After making everything all consistent, select all layers and make a duplicate (Select layers, right click > Duplicate Layers) then merge the duplicated layers (right click > Merge Layers). So it will be the main layer you have for enhancing the composition. (NOTE)
If you going to do some modification to the original layer, you need to delete the old duplicate layer then redo the duplication again.
13. For enhancing the composition, this step is optional or it depends on your taste. For what I did are the following enhancement, I add vignette (spotlight effect) to emphasize the subject. Select Brush Tool, use Soft Mechanical 715 pixel. Start on the edge making a soft arc, then do the remaining corners. To make the vignette blend on the background, make the opacity 90% and Layer Blend to Multiply. Vibrance is to increase the colorfulness (richness of the hue) of the image (Image > Adjustment > Vibrance) Vibrance: + 30 and Saturation:+10. I also change the color balance. I preserved the neutral gray and decrease the bluish green color. So I adjust midtones, +13, +7, +6, shadows to -6, -4, +12 and highlights: +7, -1, 0. I also adjust the Brightness/Contrast (Image > Adjustment > Brightness/Contrast) Brightness: 4 and Contrast: 25.

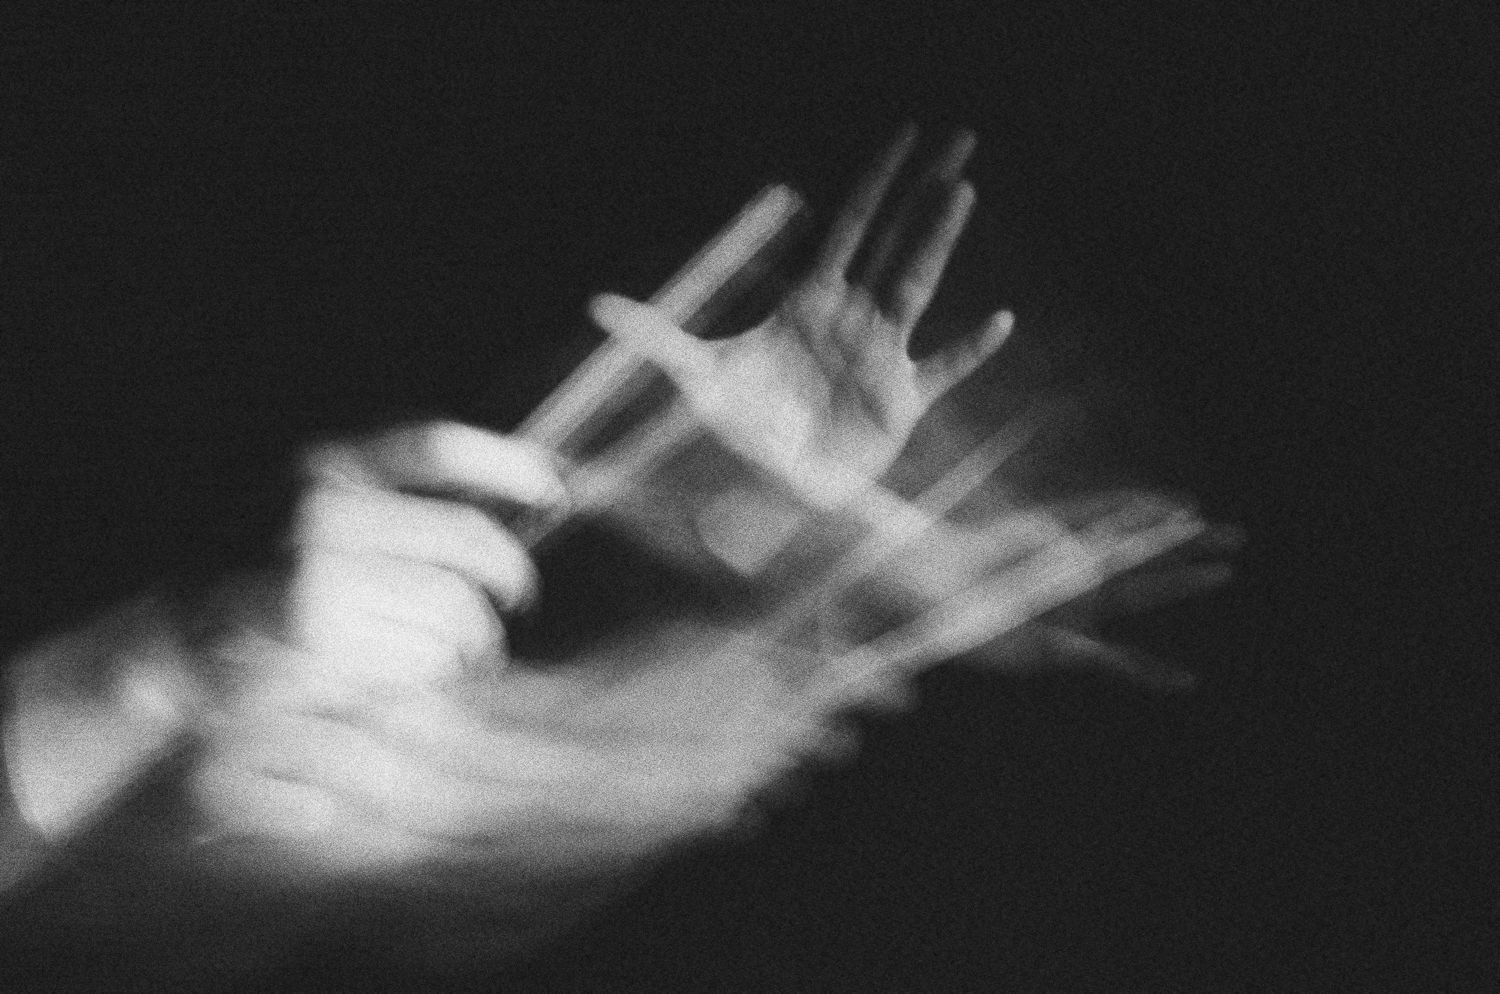
FINAL OUTPUT:
FOOTNOTES:
- The file is made in the older version of Adobe Photoshop.
- There are a lot of possible ways that you can use, different tools or way, to make the same result. Do what you are comfortable doing.
So what you think? Let me know what you think by sending your comments and reviews in the CONTACT FORM.
Share this content:
GERARD SANTIAGO
Author
Gerard Santiago is an image maker and artistic visionary. On the other hand, he is also an avid wanderer, heavy eater, and a die-hard workaholic.
READ MORE CONTENT